What’s all this fuss about?
If you’re reading this post, you likely have some familiarity with the DSpace repository system or have followed my earlier guide on installing DSpace 8.0. For those who are new, here’s a quick overview: DSpace is an open-source software platform designed to manage and disseminate digital content within libraries and institutions. It has long been a preferred choice for building digital repositories due to its robust features and adaptability.
DSpace 9.1 represents a significant evolution from previous versions, building upon the architectural changes introduced in DSpace 7.x and 8.x. The platform maintains its decoupled architecture, separating the backend and frontend into distinct components that can be installed on different machines for enhanced security and performance. This release provides bug fixes, accessibility improvements, and performance enhancements to the 9.x platform, making it an excellent choice for new installations and upgrades.
The backend continues to be built as a REST-based API interface, handling content preservation and operating at the storage layer. It’s built on Java and Spring Boot, providing a “headless” backend that supports various machine-based interfaces, including REST API, OAI-PMH, SWORD (v1 and v2), and RDF. The frontend remains an Angular-based Node.js web application that provides an attractive and modern user experience.
One of the key improvements in DSpace 9.1 over earlier versions is its compatibility with newer software versions, including Apache Solr 9.9.0, which provides better performance and security features compared to the older Solr 8.x versions used in DSpace 8.0.
With this introduction in place, let’s dive into the installation process. For this demonstration, I’ve used an Ubuntu Server 24.04 machine with the following configurations:
Hardware: Virtual Server
CPU: 16 Core
RAM: 16 GB
HDD: 300 GB
Computer Name: DSpace
Username: jesse
IP Address: 172.16.32.10
Please keep in mind that you will need to use your system settings, username, IP address etc, in the commands, or config file directives, wherever these appear in this guide.
Prerequisites and System Preparation
Before we begin the actual installation, let’s ensure our system is properly prepared and updated. The first step involves updating the system packages to their latest versions and installing essential development tools that will be required throughout the installation process.
System Update and Essential Tools Installation
We start by updating the package repositories and upgrading all existing packages to ensure we have the latest security patches and features. This is crucial for a stable installation environment.
sudo apt update && sudo apt upgrade -yThis command performs two operations: apt update refreshes the package index from all configured sources, while apt upgrade installs the latest versions of all currently installed packages. The -y flag automatically answers “yes” to prompts, making the process non-interactive.
Next, we install essential development tools and utilities that will be needed during the DSpace compilation and installation process:
sudo apt install wget curl git build-essential zip unzip -yLet me explain each package and its purpose:
- wget and curl: Command-line tools for downloading files from web servers
- git: Version control system, useful for cloning repositories and managing code
- build-essential: Meta-package that installs essential compilation tools including GCC compiler, make, and other build tools
- zip/unzip: Compression utilities for handling archive files
DSpace Directory Creation
Now we create the main directory where DSpace will be installed. This directory will contain all DSpace executables, configurations, and data:
sudo mkdir /dspace
sudo chown jesse:jesse /dspace
The first command creates the /dspace directory at the root of the filesystem. The second command changes ownership of this directory to the user “jesse” (replace with your username), giving the user full read, write, and execute permissions. This is important because the DSpace installation process needs to write files to this directory.
Java Development Kit Installation
DSpace 9.1 requires Java Development Kit (JDK) 17, which is a Long Term Support (LTS) version. Unlike the Java Runtime Environment (JRE) that only allows running Java applications, the full JDK is required because DSpace needs compilation capabilities during the build process.
sudo apt-get install openjdk-17-jdk openjdk-17-jre openjdk-17-sourceThis command installs three components:
- openjdk-17-jdk: The complete Java Development Kit, including compiler (javac)
- openjdk-17-jre: The Java Runtime Environment for executing Java applications
- openjdk-17-source: Source code for the OpenJDK, useful for debugging and understanding Java internals
Java Environment Configuration
After installing Java, we need to configure environment variables so that the system and DSpace can locate the Java installation:
sudo nano /etc/environmentAdd the following two lines to the file:
JAVA_HOME="/usr/lib/jvm/java-17-openjdk-amd64"
JAVA_OPTS="-Xmx512M -Xms64M -Dfile.encoding=UTF-8"
JAVA_HOME points to the JDK installation directory. This is the standard location where OpenJDK 17 installs on Ubuntu AMD64 systems.
JAVA_OPTS configures default Java runtime options:
-Xmx512M: Sets maximum heap memory to 512 MB (adjust based on your server’s available RAM)-Xms64M: Sets initial heap memory to 64 MB-Dfile.encoding=UTF-8: Ensures proper Unicode handling for international characters
After saving the file, load the environment variables and verify the configuration:
source /etc/environment
echo $JAVA_HOME
echo $JAVA_OPTS
java -version
The output should display the paths you configured and Java version 17.x.x.
Build Tools Installation
Apache Maven and Apache Ant are essential build tools for DSpace. Maven manages dependencies and builds the project, while Ant handles the installation and deployment tasks.
sudo apt install maven ant -yVerify the installations:
mvn -version
ant -version
Maven should show version 3.x.x or higher, and Ant should show version 1.10.x or higher. These tools are used only during the installation process and aren’t required for day-to-day DSpace operations.
PostgreSQL Database Installation and Configuration
PostgreSQL serves as the primary database for DSpace, storing all metadata, user information, and system configurations. DSpace 9.1 supports PostgreSQL versions 14, 15, 16, and 17.
PostgreSQL Installation
sudo apt-get install postgresql postgresql-client postgresql-contrib libpostgresql-jdbc-java -yThis installs:
- postgresql: The main database server
- postgresql-client: Command-line client tools for connecting to PostgreSQL
- postgresql-contrib: Additional contributed modules, including pgcrypto extension
- libpostgresql-jdbc-java: PostgreSQL JDBC driver for Java applications
PostgreSQL Service Management
Check the PostgreSQL version and ensure the service is running with the following commands:
psql -V psql
sudo pg_ctlcluster 16 main start
sudo systemctl status postgresql
The version number (16 in this case) corresponds to the PostgreSQL major version installed. The pg_ctlcluster command starts the specific PostgreSQL cluster while systemctl status confirming the service is active.
Database Security Configuration
Set a password for the PostgreSQL system account for enhanced security:
sudo passwd postgresAs you issue this command, it will ask you to set a new password for the user postgres. As a security measure, the CLI screen will not display the letters of the password as you type. Just type the password carefully and confirm it by typing again.
Then switch to the PostgreSQL user to create the DSpace database and user:
su postgresWhile switching to this user, it will again prompt for the password for the user postgres. Please provide the password that you just set.
Create a dedicated database user for DSpace with limited privileges:
createuser --username=postgres --no-superuser --pwprompt dspaceThis command creates a user named “dspace” without superuser privileges and prompts for a password. Remember this password as it will be needed in the DSpace configuration.
Create the DSpace database with proper encoding:
createdb --username=postgres --owner=dspace --encoding=UNICODE dspaceEnable the pgcrypto extension, which provides cryptographic functions required by DSpace:
psql --username=postgres dspace -c "CREATE EXTENSION pgcrypto;"Exit from the PostgreSQL user session:
exitPostgreSQL Network Configuration
Configure PostgreSQL to accept connections from DSpace. Edit the main configuration file:
sudo nano /etc/postgresql/16/main/postgresql.confFind and uncomment the line listen_addresses = 'localhost' under the connection settings. This enables PostgreSQL to listen for connections from localhost.
Configure client authentication by editing the host-based authentication file:
sudo nano /etc/postgresql/16/main/pg_hba.confAdd the following line at the end of the file:
#DSpace configuration
host dspace dspace 127.0.0.1/32 md5
This line allows the “dspace” user to connect to the “dspace” database from localhost using MD5 password authentication.
Restart PostgreSQL to apply the changes:
sudo systemctl restart postgresqlApache Solr Installation and Configuration
Apache Solr serves as the search engine for DSpace 9.1. One significant improvement in DSpace 9.1 is its support for Solr 9.9.0, which provides better performance and security compared to the Solr 8.x versions used in earlier DSpace releases.
Solr Download and Installation
Navigate to the /opt directory where we’ll install Solr:
cd /opt/Download Solr 9.9.0 from the Apache archives:
sudo wget https://archive.apache.org/dist/solr/solr/9.9.0/solr-9.9.0.tgzExtract and install Solr as a system service:
sudo tar xzf solr-9.9.0.tgz solr-9.9.0/bin/install_solr_service.sh --strip-components=2
sudo bash ./install_solr_service.sh solr-9.9.0.tgz
The first command extracts only the installation script from the archive, while the second runs the script to install Solr as a system service with proper user accounts and permissions.
Verify that Solr is listening on port 8983:
ss -altnp | grep 8983Enable automatic startup and start the Solr service:
sudo systemctl enable solr
sudo systemctl start solr
Solr Network Configuration
By default, Solr runs only on localhost for security reasons. To make it accessible from other hosts on the network (useful for distributed setups or remote access), modify the Solr configuration:
sudo nano /etc/default/solr.in.shUncomment and modify the following line as:
SOLR_JETTY_HOST="0.0.0.0"This allows Solr to accept connections from any IP address. Also add the DSpace-specific configuration option as recommended by the DSpace wiki:
SOLR_OPTS="$SOLR_OPTS -Dsolr.config.lib.enabled=true"This option enables library loading from within Solr configuration, which is required for DSpace’s Solr configurations to work properly.
Apache Tomcat Installation and Configuration
Apache Tomcat serves as the servlet container for DSpace’s backend REST API. DSpace 9.1 requires Tomcat 10 due to its Jakarta EE compatibility.
Tomcat Installation
sudo apt-get install tomcat10 tomcat10-admin tomcat10-common tomcat10-user -yThis installs:
- tomcat10: Main Tomcat application server
- tomcat10-admin: Administration web applications
- tomcat10-common: Common files shared between instances
- tomcat10-user: User instance management tools
Tomcat Permission Configuration
Configure Tomcat to have read/write access to the DSpace directory by editing the systemd service file:
sudo nano /lib/systemd/system/tomcat10.serviceFind the #Security section and add:
ReadWritePaths=/dspaceThis grants Tomcat the necessary filesystem permissions to access the DSpace installation directory.
Tomcat Server Configuration
Edit the main Tomcat server configuration to support UTF-8 encoding and optimize connection handling:
sudo nano /etc/tomcat10/server.xmlFind the default Connector configuration and comment it out:
<!-- <Connector port="8080" protocol="HTTP/1.1"
               connectionTimeout="20000"
               redirectPort="8443"
               maxParameterCount="1000"
               /> -->
Replace it with an optimized configuration:
<Connector port="8080" protocol="HTTP/1.1"
           minSpareThreads="25"
           enableLookups="false"
           connectionTimeout="20000"
           redirectPort="8443"
           disableUploadTimeout="true"
           URIEncoding="UTF-8"
           />
This configuration:
- minSpareThreads=”25″: Maintains minimum threads for better responsiveness
- enableLookups=”false”: Disables DNS lookups for better performance
- disableUploadTimeout=”true”: Prevents timeouts during large file uploads
- URIEncoding=”UTF-8″: Ensures proper Unicode handling in URLs
Reload the systemd daemon and restart Tomcat:
sudo systemctl daemon-reload
sudo systemctl restart tomcat10.service
Tomcat User Management Configuration
Configure Tomcat user management for administrative access:
sudo nano /etc/tomcat10/tomcat-users.xmlAdd the following configuration before the closing </tomcat-users> tag:
<role rolename="tomcat"/>
<role rolename="manager-gui"/>
<role rolename="manager-script"/>
<role rolename="manager-jmx"/>
<role rolename="manager-status"/>
<user username="jesse" password="YourSecurePassword" roles="tomcat,manager-gui,manager-script,manager-jmx,manager-status"/>
Replace “YourSecurePassword” with a strong password. These roles provide access to Tomcat’s web-based management interface.
Restart Tomcat to apply the changes:
sudo systemctl restart tomcat10.serviceDSpace Backend Installation
Source Code Download and Preparation
Change to the home directory and download the DSpace 9.1 source code:
cd ~
sudo wget https://github.com/DSpace/DSpace/archive/refs/tags/dspace-9.1.tar.gz
Extract the source code archive:
sudo tar zxvf dspace-9.1.tar.gzNavigate to the DSpace configuration directory:
cd DSpace-dspace-9.1/dspace/config/DSpace Configuration
Create the local configuration file from the example template:
sudo cp local.cfg.EXAMPLE local.cfgEdit the configuration file to match your environment:
sudo nano local.cfgConfigure the essential settings:
dspace.dir=/dspace
dspace.server.url = http://172.16.32.10:8080/server
dspace.server.ssr.url = ${dspace.server.url}
dspace.ui.url = http://172.16.32.10:4000
rest.cors.allowed-origins = ${dspace.ui.url}

# Name of the site
dspace.name = DSpace at Central University of Punjab

# URL for connecting to database
db.url = jdbc:postgresql://localhost:5432/dspace

# Database username and password
db.username = dspace
db.password = your_database_password
Key configuration parameters:
- dspace.dir: Points to the DSpace installation directory
- dspace.server.url: URL where the REST API will be accessible
- dspace.ui.url: URL where the frontend user interface will be accessible
- rest.cors.allowed-origins: Enables cross-origin requests from the frontend
- db.url, db.username, db.password: Database connection parameters
DSpace Compilation
Return to the main DSpace source directory and compile the application:
cd ~/DSpace-dspace-9.1/
sudo mvn package
This Maven command downloads all dependencies, compiles the source code, and packages the application. The process may take several minutes, depending on your internet connection and system performance.
DSpace Installation
Navigate to the installer directory and run the installation:
cd dspace/target/dspace-installer/
sudo ant fresh_install
This Ant task installs DSpace to the specified directory (/dspace), creates the necessary folder structure, and prepares the web applications.
Deployment of DSpace Components
Solr Cores Deployment
Copy the DSpace Solr configurations to the Solr data directory:
sudo cp -R /dspace/solr/* /var/solr/data
sudo chown -R solr:solr /var/solr/data
This copies the DSpace-specific Solr core configurations and ensures proper ownership. Restart Solr to load the new configurations:
sudo service solr restartWeb Application Deployment
Deploy the DSpace web applications to Tomcat:
sudo cp -R /dspace/webapps/* /var/lib/tomcat10/webapps/
sudo service tomcat10 restart
This copies the DSpace REST API web application to Tomcat’s webapps directory, where it will be automatically deployed.
Administrator Account Creation
Create the initial administrator account for DSpace:
sudo /dspace/bin/./dspace create-administratorThis interactive command will prompt for:
- Email address (will be used for login)
- First name
- Last name
- Password (will not be displayed while typing)
Remember these credentials as they will be needed to access the DSpace administrative interface.
Frontend Installation and Configuration
The DSpace 9.1 frontend is built with Angular and requires Node.js to run. Let’s install the necessary components and configure the user interface.
Node.js Installation
Install Node.js and npm:
sudo apt install nodejs npm -yInstall Node Version Manager (NVM) for better Node.js version management:
curl -o- https://raw.githubusercontent.com/nvm-sh/nvm/v0.39.0/install.sh | bash
source ~/.bashrc
Check available Node.js versions and install the latest LTS version:
nvm list-remoteInstall Node.js 22.19.0 (or the latest LTS version available):
nvm install 22.19.0Install essential Node.js tools globally:
npm install --global yarn
npm install --global pm2
yarn is an alternative package manager that provides better dependency resolution, while pm2 is a production process manager for Node.js applications.
DSpace Angular Source Code
Download and extract the DSpace Angular frontend:
wget https://github.com/DSpace/dspace-angular/archive/refs/tags/dspace-9.1.tar.gz
tar zxvf dspace-9.1.tar.gz
mv dspace-angular-dspace-9.1/ dspace-angular
Install frontend dependencies:
npm installThis command reads the package.json file and installs all required Node.js modules.
Frontend Configuration
Navigate to the configuration directory and create the production configuration:
cd config/
cp config.example.yml config.prod.yml
nano config.prod.yml
Edit the UI and REST configuration sections:
ui:
  ssl: false
  host: 172.16.32.10
  port: 4000
  # NOTE: Space is capitalized because 'namespace' is a reserved string in TypeScript
  nameSpace: /
  # The rateLimiter settings limit each IP to a 'max' of 500 requests per 'windowMs' (1 minute).
  rateLimiter:
    windowMs: 60000 # 1 minute
    max: 500 # limit each IP to 500 requests per windowMs
  # Trust X-FORWARDED-* headers from proxies (default = true)
  useProxies: true

rest:
  ssl: false
  host: 172.16.32.10
  port: 8080
Testing and Building
Test the REST API connection:
npm run test:restThis command verifies that the frontend can communicate with the backend REST API.
Build the production version of the frontend:
npm run build:prodThis process compiles the Angular application into optimized JavaScript files for production deployment.
Production Deployment with PM2
Return to the main frontend directory and create a PM2 configuration file:
cd ..
nano dspace-ui.json
Configure PM2 with the following JSON:
{
   "apps": [
        {
           "name": "dspace-ui",
           "cwd": "/home/jesse/dspace-angular/", // <== SET YOUR DEPLOY PATH
           "script": "dist/server/main.js", // <== Relative to cwd
           "instances": "max", // Use CPU cores
           "exec_mode": "cluster", // Enable cluster mode
           "env": {
              // Sets Node environment
              "NODE_ENV": "production",
              // Optional: Override config.prod.yml via ENV vars here
              // "DSPACE_UI_SSL": "false",
              // "DSPACE_UI_HOST": "localhost",
              // "DSPACE_UI_PORT": "4000",
              // "DSPACE_REST_SSL": "false",
              // "DSPACE_REST_HOST": "localhost",
              // "DSPACE_REST_PORT": "8080",
              // "DSPACE_REST_NAMESPACE": "/server"
           }
        }
    ]
}
Start the frontend application with PM2:
pm2 start dspace-ui.jsonPM2 will start the DSpace frontend as a background service, automatically restarting it if it crashes and utilizing all available CPU cores for optimal performance.
Verification and Testing
After completing the installation, verify that all components are working correctly:
Backend Verification
Check that the DSpace REST API is accessible:
- REST API Interface:
http://172.16.32.10:8080/server - OAI-PMH Interface:
http://172.16.32.10:8080/server/oai/request?verb=Identify
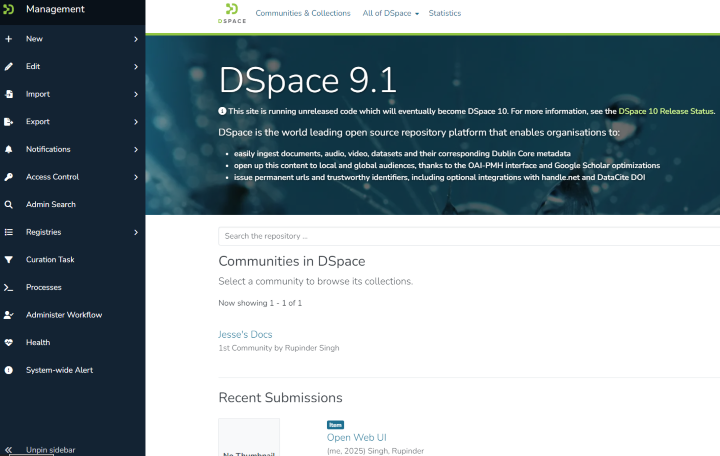
Frontend Verification
Access the DSpace user interface:
- Main Interface:
http://172.16.32.10:4000
Solr Verification
Verify that Solr is running with DSpace cores loaded:
- Solr Admin Interface:
http://172.16.32.10:8983/solr
You should see cores like search, statistics, oai, and authority in the Solr admin interface.
Key Improvements in DSpace 9.1
DSpace 9.1 brings several important improvements over earlier versions:
Performance Enhancements: Improved User Interface performance with optimized Angular Server Side Rendering (SSR) that reduces CPU and memory usage when handling bot traffic.
Accessibility Improvements: Enhanced screen reader support, improved keyboard navigation, and better ARIA live regions for notifications.
Security Updates: Updated dependencies for both frontend and backend components, addressing various security vulnerabilities.
Solr 9.x Support: Unlike DSpace 8.x, which was limited to Solr 8.x, DSpace 9.1 supports the newer Solr 9.9.0, providing better performance and security.
Bug Fixes: Numerous bug fixes in submission forms, administrative interfaces, and ORCID integration.
Production Considerations
For a production deployment, consider the following additional steps:
SSL/HTTPS Configuration: Configure a reverse proxy (Apache HTTP Server or Nginx) with SSL certificates for secure communication.
Firewall Configuration: Restrict access to sensitive ports (8983 for Solr, 8080 for Tomcat) from external networks.
Backup Strategy: Implement regular backups of the PostgreSQL database, DSpace assetstore, and Solr indexes.
Monitoring: Set up monitoring for system resources, application logs, and service availability.
Scheduled Tasks: Configure cron jobs for maintenance tasks like media filtering, checksum verification, and statistics processing.
Troubleshooting Common Issues
Database Connection Errors: Verify PostgreSQL is running and the connection parameters in local.cfg are correct.
Solr Core Loading Issues: Ensure Solr has proper permissions to read the core configurations and that the cores are properly copied to the Solr data directory.
Frontend API Connection Problems: Check that the REST API URLs in config.prod.yml match the actual backend deployment URLs.
Memory Issues: Increase Java heap memory in JAVA_OPTS if you encounter OutOfMemory errors during compilation or runtime.
Conclusion
Congratulations! You now have a fully functional DSpace 9.1 repository server running on Ubuntu 24.04 LTS. This installation provides you with a modern, scalable digital repository platform that can handle a wide variety of digital content types and provides excellent search capabilities through its Solr integration.
The decoupled architecture of DSpace 9.1 offers flexibility for future scaling and customization. You can deploy the frontend and backend on separate servers, implement load balancing, or customize the user interface to match your institution’s branding requirements.
Remember to regularly update your DSpace installation, monitor system performance, and implement proper backup procedures to ensure the long-term reliability of your digital repository.
I would love to hear about your experience with DSpace 9.1 installation, and I will be happy to help with any problems you encounter. While I don’t claim to be an expert, the DSpace community is incredibly supportive and knowledgeable, and there are many resources available for ongoing support and development.
For additional support, consult the official DSpace 9.x documentation, join the DSpace community forums, or reach out to the active DSpace developer and user community. Happy repository building!
Discover more from Rupinder Singh
Subscribe to get the latest posts sent to your email.